Advanced tweaks.
This is where things can get a little tricky. Please follow these instructions carefully!
You can change the look of your site by editing the design template that you have selected. This is done by clicking Design, and then Edit HTML/CSS.
This will take you to a screen that looks like this:
You can change the look of your site by editing the design template that you have selected. This is done by clicking Design, and then Edit HTML/CSS.
This will take you to a screen that looks like this:
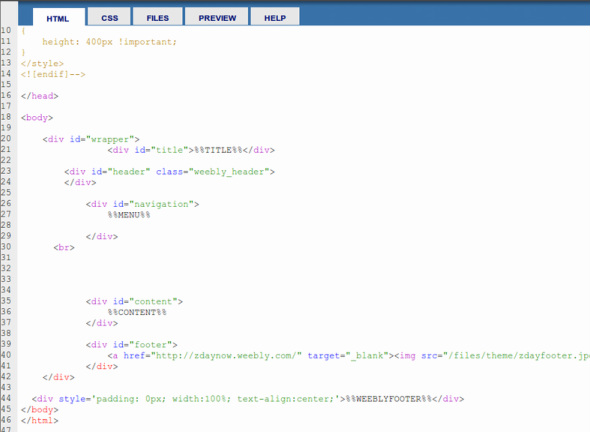
There are five sections here:
HTML - Code that defines the overall structure of your website. Within the HTML, a few special variables are used to tell Weebly where certain things are, such as the site title, navigation menu, and content area.
CSS - The CSS tab contains the CSS code that defines the look and style of your website.
Files - This is where you can upload graphics to be included on every page of your design, such as graphical footers like the one on this site, these are referenced in the CSS code.
Preview - Click here to see the results of your tweaking - if you don't like the results click cancel and not save!
Help - Weebly advice on editing the design.
If you have never explored HTML or CSS you will may well already feel somewhat overwhelmed.
Don't worry, I will explain step by step how to do the following:
Don't worry, I will explain step by step how to do the following:
1. A common problem; you have uploaded a new header image and it doesnt all fit, resulting in your image being badly croped.

Easy solution:
Click on CSS and scroll down to the section that looks like this:
#header{
width: 1020px; ...............................Your graphic needs to be this wide!
height: 250px; ................................change this to match the height of your graphic!
border-top: 0px solid #cccccc;
border-left: 0px solid #cccccc;
border-right: 0px solid #cccccc;
border-bottom: 0px solid #cccccc;
If you are creating your own header graphic make sure that you set the resolution to 72dpi, and the width to match the width of your website. If you are using a copyright free image use your favorite image manipulation software to change the dpi height and width before uploading it.
REMEMBER TO PREVIEW ANY CHANGES - AND CLICK CANCEL RATHER THAN SAVE IF THINGS DO NOT LOOK RIGHT!
2. You have found a good weebly design template, but you don't like the width of it.
Easy solution:
Click on the CSS tab, there are about six things to change to alter the width of your website, scroll down to each of these and make sure that the width setting is changed to the same width in each one.
#wrapper {
width:1020px;
margin:0pt auto;
#title{
font-family: "Times New Roman", Times, serif;
width: 1020px;
padding: 15px 0px;
font-size: 05px;
font-weight: bold;
color: #333333;
#header{
width: 1020px;
height: 250px;
border-top: 0px solid #cccccc;
border-left: 0px solid #cccccc;
border-right: 0px solid #cccccc;
border-bottom: 0px solid #cccccc;
Do the same for the width setting on these sections:
#navigation #content #footer
Why change the width of your website? - a few good reasons including; to fit more on each page, the vast majority of internet users will be able to view website 1024 pixels or wider without horizontal scrolling. Click HERE for guidance on suitable website widths.
REMEMBER TO PREVIEW ANY CHANGES - AND CLICK CANCEL RATHER THAN SAVE IF THINGS DO NOT LOOK RIGHT!
3. The navigation bar does not fit all your main pages on it, and you don't want to use the 'MORE' option to list excess pages.

Easy solution:
Click on the CSS tab, and scrool down to this section:
#navigation li a{
display: block;
height: 26px;
padding: 20px 8px 0px 8px; ....................experiment with padding, reduce the padding size to shrink the gaps between the pages on the navigation bar.
color: #ffffff;...........................................this determines the font colour. Codes for more colours here: http://www.w3schools.com/html/html_colors.asp
border-left: 0px solid #000000;
font-size: 18px; .....................................reduce the font size, the font size should look Okay down to about 10px, experiment - use the preview tab!
text-decoration: bold;
text-align: center;
If you significantly reduce the font size and/or the left and right padding you will be able to fit more pages onto the navigation bar, and hopefully you wont need to use the 'more' tab.
REMEMBER TO PREVIEW ANY CHANGES - AND CLICK CANCEL RATHER THAN SAVE IF THINGS DO NOT LOOK RIGHT!
4. Have have figured out how to use the custom html tool to put the 'add this' tool onto pages of your website? Is it a real pain having to do this on every page?

If you don't know about the 'add this tool' go here to learn more!
Easy solution:
Copy and paste the html code that you get from http://www.addthis.com/ into the html section, selected by clicking on the html tab.
You need to paste the html code in between the %%MENU%% bit and the %%CONTENT%% area.
<div id="navigation">
%%MENU%%
</div>
HTML CODE FROM 'ADD THIS' GOES HERE ............. this will result in the 'add this icons' appearing on the top of every page,
below the navigation bar, but above the content of each page.
<div id="content">
%%CONTENT%%
The code for the 'add this' tool for this website looks like the image below: (I wanted the 'add this' buttons to be on the right hand side so I added the float:right code as highlighted in blue).

Pasting any html code into the html section will result in it appearing on every page automatically, just chose where you want it to appear by slotting the html code in-between the the sections like %%menu%% - %% content%% - %%weeblyfooter%% etc.
REMEMBER TO PREVIEW ANY CHANGES - AND CLICK CANCEL RATHER THAN SAVE IF THINGS DO NOT LOOK RIGHT!
REMEMBER TO PREVIEW ANY CHANGES - AND CLICK CANCEL RATHER THAN SAVE IF THINGS DO NOT LOOK RIGHT!
Thats all for now folks!
coming soon - add a footer graphic to the bottom of every page, and how to add a comments box like the one below!
Please use the comments box below to let me know if this guide has helped you, to notify me of any errors, to ask a question, or to recommend an addition. Cheers!
coming soon - add a footer graphic to the bottom of every page, and how to add a comments box like the one below!
Please use the comments box below to let me know if this guide has helped you, to notify me of any errors, to ask a question, or to recommend an addition. Cheers!

weebly website examples
HTML Comment Box is loading comments...
